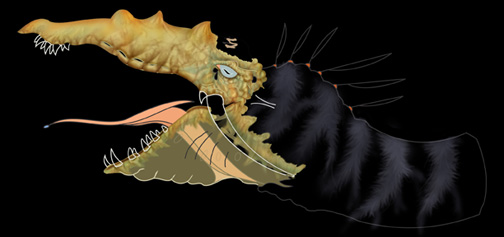
After I have the entire piece filled with flat color I will clip corresponding parts of the outline and merge with the correct layer. For example, I will separate the beak outline and merge it with the flat fill color of the beak. This will help give me a crisp (although black) outline. Once I have the layers and outlines all merged properly (again the more layers the better I say for something like this) I can lock off the pixels on those layers. This makes it possible only to paint on areas with previously filled pixels. It is a simple matter to change the black outlines to the corresponding color. It may seem like a lot of work but the solid outlines make it worth it!
Last but not least, I use the dropper to pick up colors for adding highlights and shadows for a sense of texture and form. Depending on the color I will use the airbrush set on a lower flow (around the 3 to 5% rate). Building up slowly will help have a better effect than higher flow rates slathered in quickly. WACOM tablets are best for situations like this. And again...remember to LOCK OFF THE PIXELS and you don't need to worry about going outside the lines. The process is repeated until the piece is complete.
No comments:
Post a Comment