Saturday, January 20, 2007
IF: Super Hero
They told Bernie wearing the Super Hero Sandwich costume only gave him the power to hand out coupons on the street corner for minimum wage...but when he saw the run-away bus come by he just couldn't help himself...
Thursday, January 18, 2007
Things That Go Bump In The Night: Part II
(Click to enlarge.)
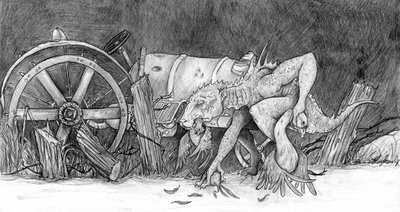
After I drew the full body pic I knew I wanted to draw a closeup, more detailed pic. It took me until a couple of days ago (about 3 months) to get around to it...I debated about using colored pencil but decided to stick with graphite (2B and HB pencil) to stay in line with the first drawing and I knew it would be a lot quicker than with the color...plus I've always liked the look of graphite. One thing to remember, it is always a good idea to take a break from a drawing and go back to work on it with fresh eyes...and it also helps when working with graphite to use a piece of tracing paper under your drawing hand to keep from smearing the work so much.
Once I completed this I knew how to set the students project up. I pulled two descriptions of the chupacabras (cryptomundo.com and wikipedia), described one real weird looking animal, and pulled a description for a cryptid creature that turned out to be real (americanmonsters.com). The point...how descriptions, witnesses, and reality can often vary.
They are as follows:
Strange Animal One:
While a buddy and I was fishing we saw a strange animal swim underneath of us It seemed like a cross between a fish, squid, and sea mammal of some sort. The skin was slick and ranged from a purple/pink to almost transparent around the ribs there app
eared to be small spots on its nose like the coloration on a squid. And speaking of squid, that nose was like a composite of a duckbill and a squids tentacle it almost reminded you of the form of womens shoes during the middle ages. Its body was like that of a carp but with long flippers that looked like the nose only slightly smaller. The eyes were set pretty high up on the head and were like two small black stones. Shortly behind the eyes was a single spine. The rear portion of the creature had two small fish-like fins, but the tail tapered off like a lizards, except it had small series of fins or feathers that lined the last ¾s of it.
Strange Creature Two:
A lizard-like being, appearing to have leathery or scaly greenish-gray skin and sharp spines or quills running down its back. This form stands approximately 3 to 4 feet (1 to 1.2 m) high, and stands and hops in a similar fashion to a kangaroo. In at least one sighting, the creature hopped 20 feet (6 m). This variety is said to have a dog or panther-like nose and face, a forked tongue protruding from it, large fangs, and to hiss and screech when alarmed, as well as leave a sulfuric stench behind. Some reports note that the creatures have pronounced eye sockets, teeth, and claws.
Strange Creature Three:
A five-foot tall humanoid reptilian body, oval head and pointy chin, bulging red eyes, fanged teeth and long, darting tongue, no ears but with auditory holes. Small holes for nostrils and a lipless mouth. It had a thin neck and thin arms with three fingered hands that had sharp claws. Sometimes reported as having bat-like leathery wings.
Strange Creature Four:
Body the size of a camel with a similar face...slightly longer and narrower leopard-like spots, and two, large, curving horns. Appears to be the result of the cross breeding of the two animals. There can appear to 5 such knotted horns on some of the animals. Long front legs and shorter rear legs. Long snake-like tail.
Students will then follow the creative process to do illustrations to be used for some Photoshop work and 'aged' soft book covers.
Things That Go Bump In The Night: Part 1
(As always, click the pic for a much larger view.)
A couple of months ago I was over at Cryptomundo.com looking over the posts. As previously stated, I like to visit there because I enjoy 'critters' and it always gets the imagination firing. Loren Coleman (really nice guy, Cryptozoologist (among other areas of expertise) and one of the many great gurus on the site...) was talking about a picture of a chupacabras that he had on a post and how there weren't many of the creature 'in action'. That got me thinking and gave me a good opportunity to draw.
With such creatures there are always eyewitness testimonies and the occasional sketch by the viewer. And then there are those that act like police sketch artists and take the information and draw from descriptions. Having just weeks before seen a show on National Geographic about chupacabras, I was amazed at how quickly natural phenomenon or explainable events were turned into stories of chupy attacks that spread across entire countries...and how varied the descriptions of the creature was. So I searched the net for written descriptions and drew based upon the following:
A lizard-like being, appearing to have leathery or scaly greenish-gray skin and sharp spines or quills running down its back. This form stands approximately 3 to 4 feet (1 to 1.2 m) high, and stands and hops in a similar fashion to a kangaroo. In at least one sighting, the creature hopped 20 feet (6 m). This variety is said to have a dog or panther-like nose and face, a forked tongue protruding from it, large fangs, and to hiss and screech when alarmed, as well as leave a sulfuric stench behind. Some reports note that the creatures have pronounced eye sockets, teeth, and claws.
I chose this version over the more 'alien-like' descriptions because it just seems much more believable and makes more 'sense' visually for the chance to be a real creature...although I'm not really buying this cryptocreature at all...bigfoot, sea serpents you can sell me on...but not this guy...(and the show did a good job of showing how insects could account for many of the freakish events)...
Next up...The Project...
Sunday, January 14, 2007
IF:Eighties
Saturday, January 06, 2007
The Thin Blue Line
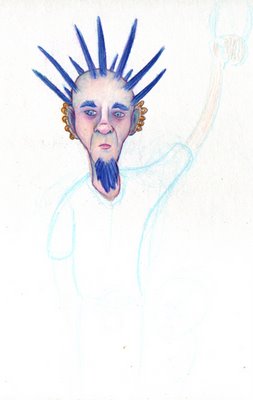
There are generally two techniques I use when prepping to draw with colored pencil. The first is described elsewhere on here (and on my Unmasked portion) using tracing paper to refine and transfer a ghost image for further drawing. Here I will describe a method I've seen on multiple occasions from cartoonists and animators hand has been used on all of my Illustration Friday (IF) colored pencil works.
I prefer to use Prismacolor pencils because of the blending quality. The only knock I have against these pencils is that sometimes in shipment they can get flexed or dropped and the 'lead' gets broken inside the pencil. When this happens and you go to sharpen them the 'lead' will just continue fall out of the wood casing. Other pencils I've tried are too hard and will not blend smoothly.
First I start with a light blue pencil to draw in the general shapes. Light blue generally does not transfer to scanners or copiers and is also used when marking mechanicals for layouts (such as magazines). In the first picture you can only see the blue lines I have darkened in heavily but in reality the entire figure is sketched in (the head has already been through the entire process and is pretty complete). Visually the light blue will disappear or can be easily blended into the other colors. When starting off with traditional graphite to rough in the shapes or leave a ghost image the problem is that the lead will often streak into your colored pencils. This will make your colors look dirty as opposed to vibrant.
This version shows the same pic with the levels adjusted so you can see the other lines.
As far as coloring as a whole...this is one method I use to help blend colors (and was used on all colored pencil drawings on my entire blog except where areas of fur are present)...I stumbled upon it the first time I used colored pencils doing a portrait because I didn't like the white patches from the tooth of the paper. I kept coloring heavier and heavier 'burnishing' the colored pencils in thickly and noticed that while doing this I could work in almost a painterly fashion blending colors. Now I use both methods depending upon the situation, as the softer touch is definitely better for a furry look.
I lay down a base color lightly.
I then go over the base color heavily with white. You can't tell a whole lot from this pic, but the white and base have started mixing and it provides a base to mix on top of...
I will then go over the arm again with the same base color or a slightly darker color. Then I will use white or a lighter color to start blending. I will finally hatch in blues or reds and use the light base color to blend again for a softer look.
This will build up a rather thick coat of color. After a while of working the area you might need to work lighter at times. If not you will start flaking off the color!
Finally, to add in details you just need a sharp colored pencil and you will be etching in to the thick layer of color you laid down.
TIPS:
This technique works best on illustration board.
Make sure to have a brush or to knock of your drawing board often as this method will leave a lot of colored fragments that can get smeared.
Have a couple of white colored pencils because you will burn a half a pencil up on a moderately size drawing.
If you are drawing 'tight refined' lines, spin your pencil after each stroke and it will help to maintain a sharp point without needing to sharpen the pencil.
After you work is complete use a fixative spray on the work. It will prevent wax bloom which can severely dull your colors.
IF: BUZZZZZ
Monday, January 01, 2007
Subscribe to:
Posts (Atom)